Cycle Terminal
OEM Style Wiring Harness Electrical Connectors and Terminals

Keep checking back for links on How to’s, Wiring Diagrams, and other great information.
If you have any Questions, please feel free to Email me at: Joe@cycleterminal.com

 First - Strip you wire to the proper length needed, This may be different for each
type of terminal crimped.
First - Strip you wire to the proper length needed, This may be different for each
type of terminal crimped.
This one approximately 5 to 6 mm will need to be striped.
Do not to nick any wire strands like I did in this second picture.
If you do cut the wiring down to the damaged standing, and re-strip the wire.
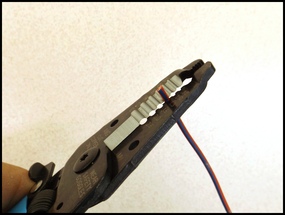
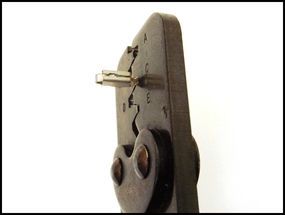
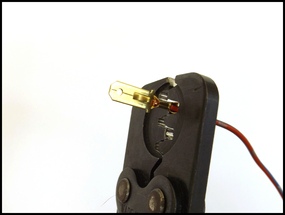
 Next - You will place the terminal in the Crimp tool die. In the photo on the left
you are looking at the upper die, the left side of the die in the photo is the wire/conductor
crimp. Right side of the die will be the insulation crimp.
Next - You will place the terminal in the Crimp tool die. In the photo on the left
you are looking at the upper die, the left side of the die in the photo is the wire/conductor
crimp. Right side of the die will be the insulation crimp.
Place the terminal in the die, so the wings for the conductor crimp are off set slightly
center into the gap between the dies surfaces.
This will give you a needed bell mouth.
So neither the tool die, or terminal cuts into the wire stranding. (See Note Below)
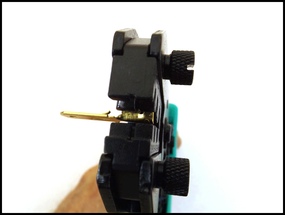
 And Finally - Making sure the wire stranding from your striped wire is straight,
not spread out/apart, and not twisted. Insert your striped wire into the terminal,
making sure all the strands make it into the terminal to be crimped.
And Finally - Making sure the wire stranding from your striped wire is straight,
not spread out/apart, and not twisted. Insert your striped wire into the terminal,
making sure all the strands make it into the terminal to be crimped.
(With some terminals, the wire will only go in so far before the insulation bottoms
out in the terminal) otherwise if striped to the proper length, make sure you have
about 1mm of wire sticking out the opposite side.
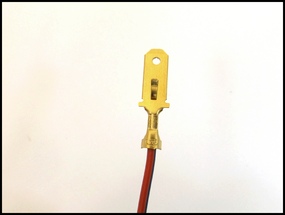
You can now crimp the terminal, and should have something like this on the right.
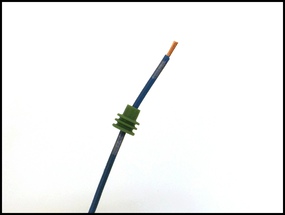
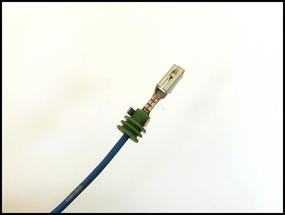
 First - Before striping the wire, Insert the wire through the seal.
Then you can strip the wire carefully so you don't nick or cut any of the stranded
wires.
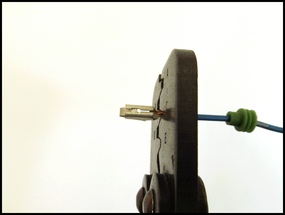
 Next - You will place the terminal in the Crimp tool die.
Place the terminal in the die, so the wings for the conductor crimp are positioned
toward the wire seal just off the die about .5mm.
(As seen in the photo on the right)
This will give you a bell mouth, so the tool or crimped terminal does not cut into
the wire stranding.
 Make sure the wire stranding from your striped wire is straight, not spread out/apart,
and not twisted. Insert your striped wire into the terminal, making sure all the
strands make it into the terminal to be crimped.
Make sure the wire stranding from your striped wire is straight, not spread out/apart,
and not twisted. Insert your striped wire into the terminal, making sure all the
strands make it into the terminal to be crimped.
(I normally slide the seal just up to the bare wire before inserting the wire into
the terminal) I did it like this for the photo’s.
You can now crimp the terminal, and then slide the seal into place.
You should have something like this on the right.
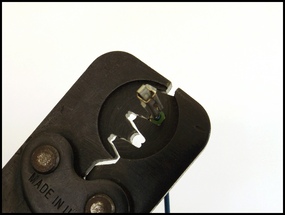
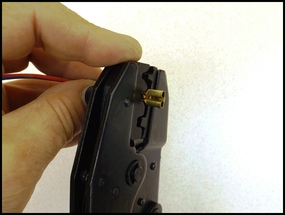
 And Finally the wire seal - (which serves as insulation stain relief, and to seal
out the elements on this the sealed connector system)
And Finally the wire seal - (which serves as insulation stain relief, and to seal
out the elements on this the sealed connector system)
This will only get a partial crimp, with the largest die on this tool.
You want just enough of a crimp to hold the seal in place, You don’t want to cut
into it.
So stop applying pressure when you get to this point,
as seen in the photo on the right.
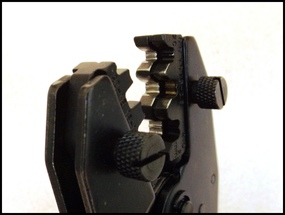
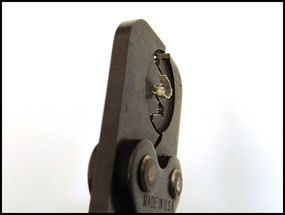
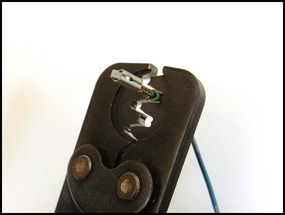
 Release the ratchet using the lever at the bottom of the tool frame, you should
now have a crimped terminal that looks like the photo on the right.
Release the ratchet using the lever at the bottom of the tool frame, you should
now have a crimped terminal that looks like the photo on the right.
Good luck, you can do it too!!
Metri-pack Crimp tool and Metri-pack Terminal
Metri-pack Crimp tool and Standard Spade Terminal
 Basically the same as above.
This will be a 2 step crimp as well, the Conductor, then the insulator.
Using a standard 250 14-18 AWG terminal and 16 Gauge wire.
Even though this tool is not designed for these terminals you can get some really
good crimps with it.
(Provided you use the proper terminal, Wire Size, and tool die)
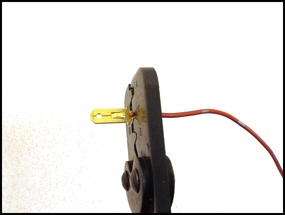
 On the left is a photo of the back side of the terminal, showing the pressure the
die put on the terminal.
On the left is a photo of the back side of the terminal, showing the pressure the
die put on the terminal.
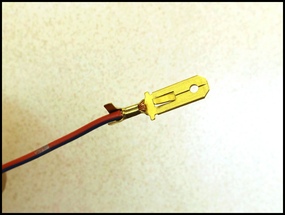
And this one looks pretty good.
Now you can crimp the insulation with one of the larger dies.
 And this should be your results when finished.
Good luck!!
I hope to get some photo’s of the smaller pin terminals soon!!
View Cart
Please use the Google+ Button
Here are a couple tips to hopefully help some of you achieve proper crimps.
There are lots of Different terminals and dies for each, so practice with each type of terminal is necessary
so pick up a few extra terminals!!
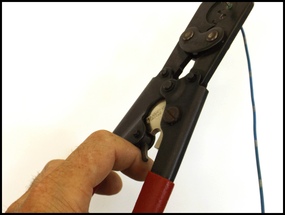
Most Ratcheting type Crimp tools have a Crimp tool pressure adjustment, and Ratchet release lever on them.
So if you miss-position a terminal, or need to release the ratchet before reaching a certain amount of pressure.
You can push or pull the lever to release it.
You will be able to do most terminals with a couple crimp tools, But you will not be able to do them all.
Most open barrel crimp tools will do the 110, 250, 312, Delphi, and the bullet terminals.
While another will do the 090 and smaller Sumitomo, Delphi, Amphenol - Deutsch and Molex pin terminals.
And some of the thick Ring terminals will require an even larger heavy duty crimp tool, that I do not offer at this time.
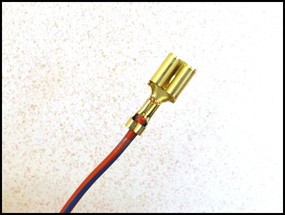
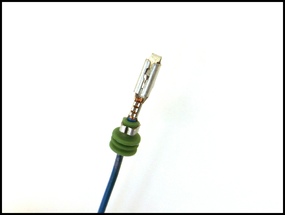
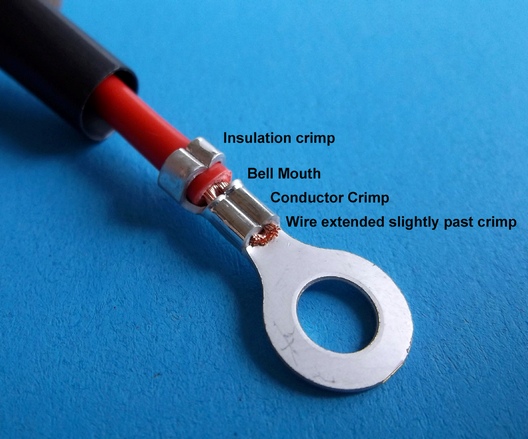 Here is a Proper Terminal crimp!!
14 AWG wire with a .8mm Thick 6mm ring terminal.
1 -Notice the insulation crimp does not pierce the wire insulation, but holds it
nicely. And there is plenty of insulation for it the grab.
2 - The conductor/wire is extended slightly past the wire crimp.
3 - The terminal is not distorted.
4 - The conductor/wire crimp has a Bell Mouth on the top edge closest to the insulator.
This means that neither the crimp tool, or the terminal cut into the wire stranding
of the conductor.
Note: You may get close, But None of these crimp tools are capable of crimping these
thick .81 6mm Ring terminals at this Quality.
Standard Open Barrel Crimp tool
(NOTE) You may need to use a larger or smaller die for certain wire and terminal size combinations.
EXAMPLE-1: When using 18 gauge (.75mm) wire with a .250, or bullet terminal designed for 14-18 gauge wire.
Use the center die marked for 14-16 gauge wire. And make sure you complete the full crimp cycle.
EXAMPLE-2: When using 12 gauge wire with certain terminals you may need to use the center die marked for
14-16 gauge wire, and Release the ratchet lever before the crimp tool completes the full cycle, or reduce the
crimp pressure on the tool to complete the crimp cycle.
These are just examples, practice, trial, and error is needed with different combinations
of tooling, wire size, and terminals.
